
When your digestive system is out of whack, your first thought is probably not about practicing yoga for constipation. But certain yoga poses and breathing practices can massage the abdomen in ways that offer you relief. And if you experience digestive sluggishness as a chronic condition, you may find that the regular practice of yoga poses for constipation can lessen the likelihood of feeling blocked and bloated.
How Yoga Can Ease Constipation
Physical activity can stimulate the muscles in your intestine. That’s where yoga comes in. Certain yoga poses—particularly twisting poses and those that place pressure on the abdomen—can engage the muscles of your core and encouraging waste to move along. In fact, a 2015 study found that yoga can ease symptoms of irritable bowel syndrome, which often includes bouts of constipation.
Yoga also affects the vagus nerve, which sends signals from your brain to your gut. Stimulating the vagus nerve has been shown to activate anti-inflammatory properties which can restore equilibrium in the microbiota-gut-brain axis, according to a 2018 study.
That’s just the physical part. There’s an added benefit when it comes to practicing yoga poses for constipation: The stress-reducing qualities of the practice can activate your parasympathetic nervous system, which helps you “rest and digest” and enables your GI system to operate efficiently.
Other Causes of Constipation
Any number of conditions can cause your digestive tract to feel sluggish or blocked. Constipation can be caused by stress, travel, being sedentary, not eating enough fiber, or not drinking enough water.
Those who experience Parkinson’s, multiple sclerosis, stroke, or nerve damage can also be at risk of constipation. Certain medications can also prevent your colon from absorbing enough water from food you ingest, making it more difficult to eliminate.
A recent study found that people who had COVID were more likely to experience gastrointestinal problems, including constipation, for up to a year after being diagnosed with the virus. Those who suffered more severe virus symptoms had a higher likelihood of intestinal problems.
Yoga Poses for Constipation Relief
While yoga isn’t a cure-all for the conditions that can cause sluggish digestion, it can help. As you practice, focus on your breath and keep it slow and steady. Even though you might find yourself unintentionally holding your breath, that will only increase muscular tension and prevent you from experiencing the full benefits of these yoga poses for constipation.
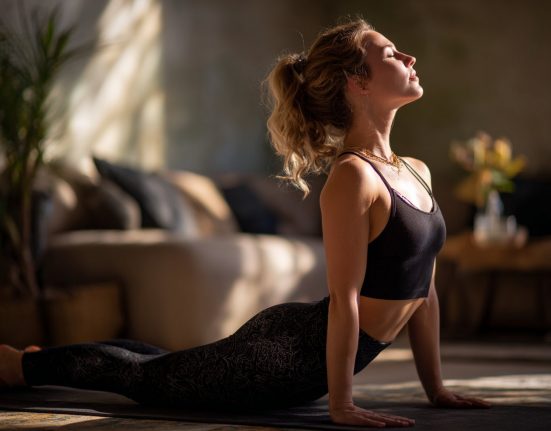
1. Cobra Pose (Bhujangasana)
An integral pose in many classes, Cobra places modest pressure on the abdomen, making it one of several essential yoga poses for constipation.
- Lie on the floor with your legs stretched out behind you at least hip-width apart. If desired, fold a blanket and place it beneath your stomach and hips. Place your hands under your shoulders and hug your elbows toward your body.
- As you exhale, press the tops of your feet and thighs into the floor.
- As you inhale, press down through your hands to lift your chest slightly in Cobra Pose. Draw your pubis toward your navel.
- Continue to breathe as you lift your chest forward and release your shoulders away from your ears. Keep your gaze forward and down.
- Stay here for up to 30 seconds. Release your forehead to the floor. Counter your backbend with a subtle forward bend, such as Child’s Pose.
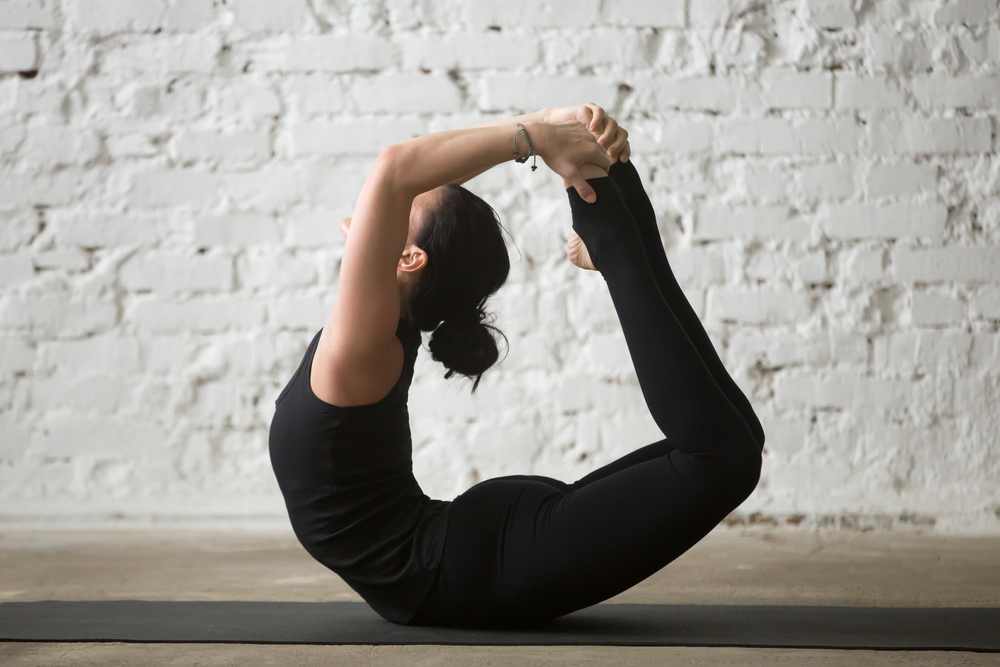
2. Bow Pose (Dhanurasana)
Similar to Cobra Pose, Bow Pose places pressure on the abdomen, which can help get things moving and keep you regular. This pose is a more intense backbend, so only attempt it toward the end of a yoga sequence that incorporates other gentler back bends.
- Lie on your belly and bend your knees to bring your heels close to your glutes.
- Reach back to take hold of your ankles or loop a strap around your feet. Keep drawing your thighs toward each other.
- Inhale and push your heels away from your back while lifting your thighs. Lift your head and chest off the floor.
- Press your shoulder blades firmly against your back to broaden across your chest. Breathe here.
- Release your ankles and slowly lower yourself to the floor. Counter your backbend by lying on your back with your knees drawn toward your chest.
3. Half Lord of the Fishes Pose (Ardha Matsyendrasana)
The twisting action of Ardha Matsyendrasana stimulates the muscles of the abdomen and is believed to encourage movement along the digestive tract.
- Start seated with your legs straight in front of you. Bend your right knee and bring your foot outside your left thigh. Keep your left leg straight or bend your left knee and tuck your foot alongside your right hip.
- Exhale and twist your midsection toward your right thigh. Bring your right hand on the floor behind your right hip like a kickstand. Hold your right knee with your left hand or wrap your left forearm around your right shin and thigh.
- Turn your gaze over your right shoulder.
- As you inhale, sit taller. As you exhale, ease into the twist a little more deeply if that’s comfortable for you. Rather than hold your breath, keep your inhalations and exhalations slow and steady. Lower your shoulders away from your ears and release any tension in your face and chest. Notice if you’re clenching your hands and, if you are, relax a little.
- When you are ready, slowly unwind and pause before you switch sides.
4. Bharadvaja’s Twist (Bharadvajasana)
Like Half Lord of the Fishes Pose, Bharadvajasana is a seated twist that places pressure on the abdomen to help with constipation. You can practice both or simply opt for whichever feels better in your body.
- Sit in a cross-legged position on the floor or on a folded blanket.
- Exhale and twist your midsection toward your right thigh. Place your right hand on the floor behind your right hip like a kickstand. Place your left hand on your right knee.
- Turn your gaze over your right shoulder.
- As you inhale, sit taller. As you exhale, ease into the twist a little more deeply if that’s comfortable for you. Rather than hold your breath, keep your inhalations and exhalations slow and steady. Lower your shoulders away from your ears and release any tension in your face and chest. Notice if you’re clenching your hands and, if you are, relax a little.
- When you are ready, slowly unwind and pause before you switch sides.
5. Reclined Twist
Practicing a twist while lying down brings the same benefits as seated twists but usually with significantly less effort and strain on your lower back.
- Lie on your back with your knees bent and your feet on the floor. Extend your arms straight out from your shoulders in a T shape.
- Draw your knees toward your chest.
- Slowly lower your knees toward your left side, keeping your knees bent. If your legs don’t reach the floor, place a folded blanket or pillow beneath or between them for support so you can relax your legs, abs, and shoulders.
- Release the muscles of your back, shoulders, and chest. Your shoulder opposite of the twist might lift off the floor and that’s fine.
- Gaze toward the ceiling or turn your head to the right.
- When you are ready, slowly unwind and pause before you switch sides.
6. Plow Pose (Halasana)
The inversion known as Plow compresses the abdominal organs in a different fashion than twists and can stimulate movement.
- Stack two or three blankets with their folded edges all on the same side. Lie back so the tops of your shoulders are about an inch past the folded edge of the blankets.
- Bend your knees and bring your feet on the floor.
- Draw your knees toward your chest. Using your abs and the support of your hands at your low or mid back, lift your hips and bring your legs toward the ceiling so your weight is supported by your shoulders.
- Slowly extend your legs over your head and toward the wall behind you. Flex your feet and rest your toes on the ground or a block.
- Support your back with your hands, keeping the elbows tucked shoulder-distance apart, or release your hands and place your arms on the floor, palms pressing down.
- Come out of the pose the same way you came into it by slowly rolling down until your back is on the floor.
7. Squat Pose (Malasana)
Research has found, time and again, that a squatting position is said to bring about the most efficient elimination with the least amount of strain.
- Squat with your feet hip-distance apart or wider and angle your feet slightly outward. Rest your sitting bones on a block or stack of books. If your heels don’t touch the floor, slide a rolled blanket or pillow underneath them.
- Separate your thighs slightly wider than your torso. Exhale and lean your body forward in between your thighs.
- Bring your palms together in Anjali Mudra (Salutation Seal) at your chest, press your elbows against your inner knees, and resist that action with the strength of your legs.
- When you’re ready, come to any seated position.